How To Build a PHP Contact Form - Part 2 of 3
In part 1 of this tutorial we built out the basic contact form using the server's built in email server. In part 2 of this PHP tutorial we will add the phpMailer to the form, this will enable us to send the email using a third party email server like gmail.
Step 1 is to install composer (you can find the instructions here).
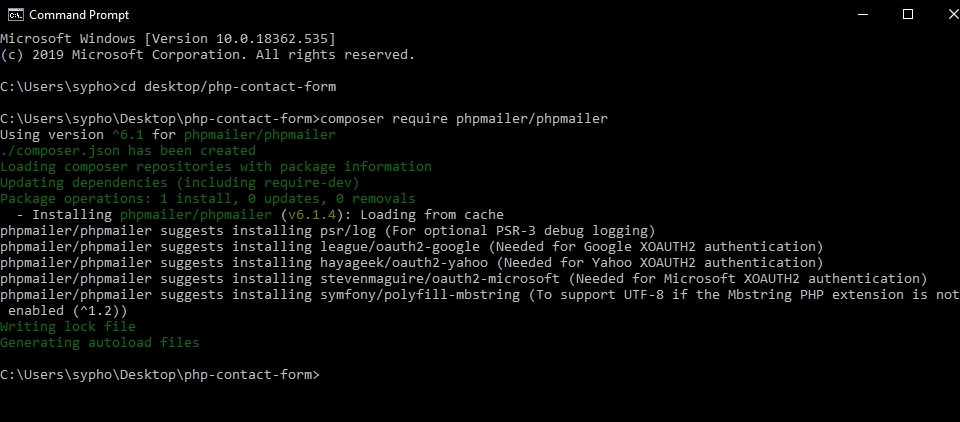
Step 2 is to install phpMailer through composer. To do this open up the command line interface (CMD/Terminal) and then navigate to your project directory and run composer require phpmailer/phpmailer

Now we will modify the contact form to use the phpMailer library for sending out emails. First you will need to add the classes and the autoloader to the top of your script.
      <?php
      // import phpmailer global namespace - must be at the very op of your script (not inside a function)
      use PHPMailer\PHPMailer\PHPMailer;
      use PHPMailer\PHPMailer\SMTP;
      //set the correct timezone
      date_default_timezone_set('Africa/Johannesburg');
      // Load Composer's autoloader
      require 'vendor/autoload.php';
      // handle the post request
      if($_SERVER['REQUEST_METHOD'] == 'POST') {
      // continued
The next step is to spin up a phpMailer instance to send the email.
      // send the email
      if(count($errors) == 0) {
        // wrap the message
        $message = wordwrap($message);
        // send the mail
        $mail = new PHPMailer;
        $mail->isSMTP();
        //$mail->SMTPDebug = SMTP::DEBUG_OFF;
        $mail->SMTPDebug = 0;
        // mail server configuration
        $mail->Host = 'mail.devspace.co.za';
        $mail->Port = '465';
        $mail->SMTPSecure = 'ssl';
        $mail->SMTPAuth = true;
        $mail->Username = 'no-reply@devspace.co.za';
        $mail->Password = 'xxxxxxxxxxx';
        // Recipients
        $mail->setFrom('no-reply@devspace.co.za', 'Website Mail Service');
        $mail->addAddress('youtube@erikthiart.com', 'Erik Thiart');
        // mail content
        $mail->isHTML(true);
        $mail->Subject = "Website Enquiry";
        $mail->Body =
        '
        <h4>Website Enquiry</h4>
        <strong>Full Name:</strong> '.$first_name.' '.$last_name.'<br>
        <strong>E-mail Address:</strong> '.$email.'<br>
        <strong>Message:</strong> '.$message.'<br>
        <br>
        Timestamp: '.date('Y-m-d H:i:s').'
        ';
        // send email
        if($mail->send()) {
          // send confirmation
          $confirm_message = 'Thank you for your message, '.$first_name.' - we have received it sucessfully.';
        } else {
          // display the error message
          array_push($errors, "The email failed to sent, here is the error: ".$mail->ErrorInfo);
        }
      }
Pulling this all together
      <?php
      // import phpmailer global namespace - must be at the very op of your script (not inside a function)
      use PHPMailer\PHPMailer\PHPMailer;
      use PHPMailer\PHPMailer\SMTP;
      //set the correct timezone
      date_default_timezone_set('Africa/Johannesburg');
      // Load Composer's autoloader
      require '../vendor/autoload.php';
      // handle the post request
      if($_SERVER['REQUEST_METHOD'] == 'POST') {
        // initialize everything
        // set the error variable array
        $errors = array();
        // functions
        function clean_input($user_input) {
          $user_input = trim($user_input);
          $user_input = stripslashes($user_input);
          $user_input = htmlspecialchars($user_input);
          return $user_input;
        }
        // check if the user input is empty, clean it up and set the variables.
        // first name
        if(!empty($_POST['first_name'])) {
          $first_name = clean_input($_POST['first_name']);
        } else {
          array_push($errors, "First name cannot be empty.");
        }
        // last name
        if(!empty($_POST['last_name'])) {
          $last_name = clean_input($_POST['last_name']);
        } else {
          array_push($errors, "Last name cannot be empty.");
        }
        // email address
        if(!empty($_POST['email'])) {
          // check if this is a legit email address
          if(filter_var($_POST['email'], FILTER_VALIDATE_EMAIL)) {
            $email = clean_input($_POST['email']);
          } else {
            array_push($errors, "The e-mail address is not valid.");
          }
        } else {
          array_push($errors, "E-mail cannot be empty.");
        }
        // form message
        if(!empty($_POST['message'])) {
          $message = clean_input($_POST['message']);
        } else {
          array_push($errors, "Please enter your message.");
        }
        // send the email
        if(count($errors) == 0) {
          // wrap the message
          $message = wordwrap($message);
          // send the mail
          $mail = new PHPMailer;
          $mail->isSMTP();
          $mail->SMTPDebug = 0;
          // mail server configuration
          $mail->Host = 'mail.devspace.co.za';
          $mail->Port = '465';
          $mail->SMTPSecure = 'ssl';
          $mail->SMTPAuth = true;
          $mail->Username = 'no-reply@devspace.co.za';
          $mail->Password = 'xxxxxxxxxxx';
          // Recipients
          $mail->setFrom('no-reply@devspace.co.za', 'Website Mail Service');
          $mail->addAddress('youtube@erikthiart.com', 'Erik Thiart');
          // mail content
          $mail->isHTML(true);
          $mail->Subject = "Website Enquiry";
          $mail->Body =
          '
          <h4>Website Enquiry</h4>
          <strong>Full Name:</strong> '.$first_name.' '.$last_name.'<br>
          <strong>E-mail Address:</strong> '.$email.'<br>
          <strong>Message:</strong> '.$message.'<br>
          <br>
          Timestamp: '.date('Y-m-d H:i:s').'
          ';
          // send the mail
          if($mail->send()) {
            $confirm_message = 'Thank you for your message, '.$first_name.' - we have received it sucessfully.';
          } else {
            // display a useful message. (dont lose the client)
            array_push($errors, "The email failed to sent, here is the error: ".$mail->ErrorInfo);
          }
        }
      }
      ?>
      <?php include 'header.php'; ?>
      <div class="jumbotron jumbotron-fluid">
        <div class="container">
          <h1 class="display-4">Intermediate contact form</h1>
        </div>
      </div>
      <div class="container">
        <div class="row">
          <div class="col-sm">
            <?php if(!empty($errors)): ?>
              <div class="alert alert-danger" role="alert">
                  <?php
                    foreach($errors as $error) {
                      echo $error . "<br>";
                    }
                  ?>
              </div>
            <?php endif;?>
            <?php if(!empty($confirm_message)):?>
              <div class="alert alert-success" role="alert">
                  <?=$confirm_message;?>
              </div>
            <?php endif;?>
            <form action="" method="post">
              <div class="form-group">
                <label for="">First Name</label>
                <input type="text" class="form-control" id="first_name" name="first_name">
              </div>
              <div class="form-group">
                <label for="">Last Name</label>
                <input type="text" class="form-control" id="last_name" name="last_name">
              </div>
              <div class="form-group">
                <label for="">Email address</label>
                <input type="email" class="form-control" id="email" name="email">
              </div>
              <div class="form-group">
                <label for="message">Message</label>
                <textarea class="form-control" id="message" name="message" rows="3"></textarea>
              </div>
              <button type="submit" class="btn btn-primary">Submit</button>
            </form>
          </div>
        </div>
      </div>
      <?php include 'footer.php'; ?>
Click here to access part 3 of this tutorial where we will add a MySQL server to the project.


