How To Transcribe Video Files To Text Files Using Amazon AWS Transcribe For Free.
In this tutorial, we will create a Word Document from a YouTube Video using the automatic speech recognition service from Amazon called, AWS Transcribe.
We will upload an mp3 file to the AWS transcribe service, which will then give us a JSON file containing the text of the audio file, and then we will take that JSON file and convert it to a word document.
Prerequisites:
You will need an AWS account; you can click here to create an account for free.
You will need an MP3 version of the file, there are many ways to download a youtube video to MP3, you can follow my guide to do it quickly.
Step 1: Create an AWS S3 bucket to store your MP3 Files in
You need to create an S3 bucket on AWS, look at a bucket essentially as a storage pot on S3. In essence, S3 is an AWS service and inside of that service, you can create yourself little storage pockets/folders, called buckets.
To create a bucket
- Sign in to the AWS Management Console and open the Amazon S3 console at https://console.aws.amazon.com/s3/.
- Choose Create bucket.
The Create bucket wizard opens.
- In Bucket name, enter a DNS-compliant name for your bucket. Basically lowercase, no spaces. After you create the bucket, you can’t change its name so choose something description like your-name-transcribing-files
- Choose the region closes to you.
- Leave everything else as is and then create the bucket.
Step 2: Upload your MP3 file to the AWS bucket you just created.
Upload your MP3 file to your bucket, give it a nice name so that when you come back to this in 6 months’ time you still know what it was about.
Step 3: Start the Transcribe process using the MP3 file in the bucket.
Now we need to transcribe the file, in essence; you will tell AWS where the file is (on S3) and then you will tell AWS what to do with the file, in this case, we want to transcribe it.
Go here: https://console.aws.amazon.com/transcribe/home
Then click on create job.

Give it a descriptive name
Leave the model type as “General model”
Click on browse S3 and choose the file you uploaded in step 2
Leave the Output data option as “Service-managed S3 Bucket”, because we will download the file immediately, we do not need AWS to keep it forever.
Now wait for the job to finish, this normally takes about 10 minutes for a 30-minute-long file.
When the file is finish, click on it
Then on this screen that appears click on “Download full transcript” it will be available in JSON format, we will convert that to a Word document in Step 5
Step 4: Create a folder on your desktop and save the JSON file
We need to store the JSON file and our python app somewhere, so create a folder on your desktop and call it something descriptive like “Transcriptions”.
Just in case you missed it, on the AWS Transcription Jobs screen, click on the transcribed file after it completed and a new screen will appear, now on that new screen click on download full transcript and then save that JSON file in the folder you just created.
Rename that JSON file to something that you will remember, for example interview.json
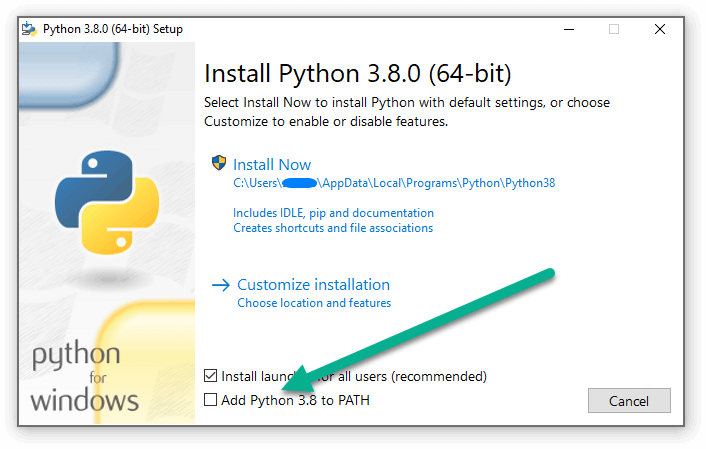
Step 5: Install Python, we need it to convert the JSON file to Word Document.
Download Python by clicking on this link: Download Python 3 for windows
Now install that file, when the window pops up, click on “Add Python to PATH”
Step 6: Install the tscribe library for Python
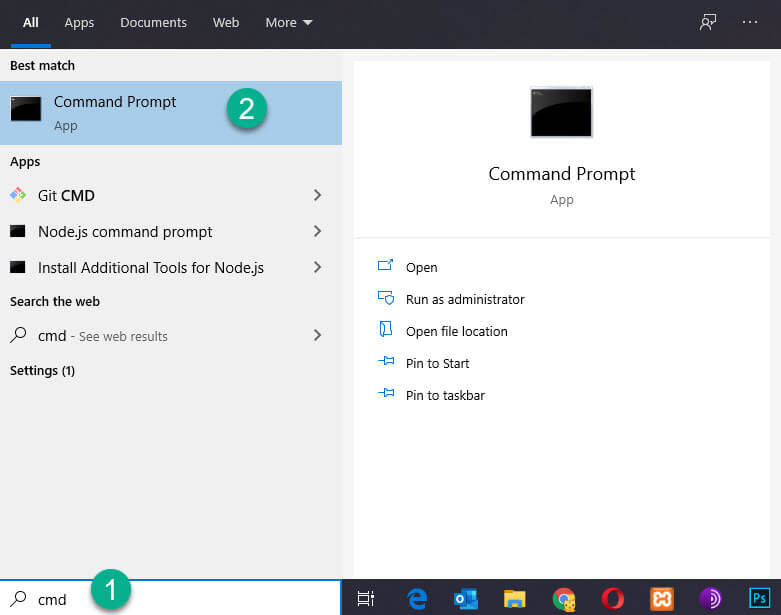
Open CMD (Inside the search field from your taskbar, enter command or cmd. Then, click or tap on the Command Prompt result.)
Now type in the following command:
pip install tscribeThis will install the library that we need. Wait for this to finish, it will look something like this:
      C:\Users\erikthiart\Desktop\aws>pip install tscribe
      Collecting tscribe
        Downloading tscribe-1.3.1-py3-none-any.whl (7.2 kB)
      Collecting python-docx
        Downloading python-docx-0.8.10.tar.gz (5.5 MB)
           |████████████████████████████████| 5.5 MB 6.4 MB/s
      Collecting webvtt-py
        Downloading webvtt_py-0.4.5-py3-none-any.whl (16 kB)
      Collecting pandas
        Downloading pandas-1.1.0-cp38-cp38-win_amd64.whl (9.6 MB)
           |████████████████████████████████| 9.6 MB 6.4 MB/s
      Collecting matplotlib
        Downloading matplotlib-3.3.1-cp38-cp38-win_amd64.whl (8.5 MB)
           |████████████████████████████████| 8.5 MB 6.4 MB/s
      Requirement already satisfied: lxml>=2.3.2 in c:\users\erikthiart\appdata\local\packages\pythonsoftwarefoundation.python.3.8_qbz5n2kfra8p0\localcache\local-packages\python38\site-packages (from python-docx->tscribe) (4.5.1)
      Collecting docopt
        Downloading docopt-0.6.2.tar.gz (25 kB)
      Collecting pytz>=2017.2
        Downloading pytz-2020.1-py2.py3-none-any.whl (510 kB)
           |████████████████████████████████| 510 kB 6.4 MB/s
      Collecting numpy>=1.15.4
        Downloading numpy-1.19.1-cp38-cp38-win_amd64.whl (13.0 MB)
           |████████████████████████████████| 13.0 MB 13 kB/s
      Collecting python-dateutil>=2.7.3
        Downloading python_dateutil-2.8.1-py2.py3-none-any.whl (227 kB)
           |████████████████████████████████| 227 kB ...
      Collecting pillow>=6.2.0
        Downloading Pillow-7.2.0-cp38-cp38-win_amd64.whl (2.1 MB)
           |████████████████████████████████| 2.1 MB 3.2 MB/s
      Collecting cycler>=0.10
        Downloading cycler-0.10.0-py2.py3-none-any.whl (6.5 kB)
      Collecting pyparsing!=2.0.4,!=2.1.2,!=2.1.6,>=2.0.3
        Downloading pyparsing-2.4.7-py2.py3-none-any.whl (67 kB)
           |████████████████████████████████| 67 kB 4.8 MB/s
      Collecting kiwisolver>=1.0.1
        Downloading kiwisolver-1.2.0-cp38-none-win_amd64.whl (58 kB)
           |████████████████████████████████| 58 kB ...
      Requirement already satisfied: certifi>=2020.06.20 in c:\users\erikthiart\appdata\local\packages\pythonsoftwarefoundation.python.3.8_qbz5n2kfra8p0\localcache\local-packages\python38\site-packages (from matplotlib->tscribe) (2020.6.20)
      Collecting six>=1.5
        Downloading six-1.15.0-py2.py3-none-any.whl (10 kB)
      Installing collected packages: python-docx, docopt, webvtt-py, pytz, numpy, six, python-dateutil, pandas, pillow, cycler, pyparsing, kiwisolver, matplotlib, tscribe
          Running setup.py install for python-docx ... done
          Running setup.py install for docopt ... done
      Successfully installed cycler-0.10.0 docopt-0.6.2 kiwisolver-1.2.0 matplotlib-3.3.1 numpy-1.19.1 pandas-1.1.0 pillow-7.2.0 pyparsing-2.4.7 python-dateutil-2.8.1 python-docx-0.8.10 pytz-2020.1 six-1.15.0 tscribe-1.3.1 webvtt-py-0.4.5

      C:\Users\erikthiart\Desktop\aws>
Step 7: Writing the Python code required to convert JSON to Word
Create a text file in the folder on your desktop that you created in Step 4.
Call the text file app.py
Now open that file with Notepad and copy and paste the following inside:
      import tscribe
      tscribe.write("interview.json", format="docx", save_as=" interview.docx")
Step 8: Run the python script.
Open CMD again and then paste the following command in order to get to this folder you created in Step 4.
cd C:\Users\%username%\Desktop\TranscriptionsType it exactly like that (copy it), do not change anything, that \%username%\ part is intentional, it will essentially resolve to whatever your username is, which I won’t know since I am sitting in Cape Town and do not know your PC name.
If you did it correctly then you will see you are successfully inside that folder.
      Microsoft Windows [Version 10.0.18363.1016]
      (c) 2019 Microsoft Corporation. All rights reserved.

      C:\Users\erikthiart>cd C:\Users\%username%\Desktop\Transcriptions

      C:\Users\erikthiart\Desktop\Transcriptions>
Now type the following command in CMD
python app.pyYou will see the following after a little while.
interview.docx written in x seconds.That means it worked! Congratulations, you can now look inside that folder and you will see a word document containing your text translation of the audio file.
AWS Transcribe Result
Transcription of Omeshnee: Begotten from Future Cities Africa
Transcription using AWS Transcribe automatic speech recognition and the ‘tscribe’ python package.
Document produced on Sunday 16 August 2020 at 18:03:15.
| Confidence | Count | Percentage |
| 98% – 100% | 1809 | 77.94% |
| 90% – 97% | 127 | 5.47% |
| 80% – 89% | 62 | 2.67% |
| 70% – 79% | 37 | 1.59% |
| 60% – 69% | 30 | 1.29% |
| 50% – 59% | 27 | 1.16% |
| 40% – 49% | 14 | 0.6% |
| 30% – 39% | 8 | 0.34% |
| 20% – 29% | 1 | 0.04% |
| 10% – 19% | 0 | 0.0% |
| 0% – 9% | 0 | 0.0% |
Additional Help:
If you need any help setting this up, please follow me on Twitter (@ErikThiart) and then you can tweet me and I will help you where you get stuck.
If you found this guide to be useful and would like to make a donation, please head over to my donations page, I use the funds to pay for the hosting of this website and to buy beer on the weekends.
Popular Categories
Ad Blockers AWS Bitcoin CMD cPanel crypto Dark web Google IoT MikroTik Python Reviews SmartDNS Sonoff Tor VPN Windows WordPress Xiaomi Youtube Raspberry PiSubscribe (It's Free)
Featured Articles

An affordable VPN that also comes with a Geo Blocker
The internet is full of restrictions, censorship, privacy invasions, security breaches, and a host of unwanted entities trafficking in your personal data. Using a VPN is a great first step toward protecting your privacy online. Privacy is fundamental to a well-functioning society because it allows norms, ethics, and laws to be safely discussed and challenged. Without privacy, a free and open society can neither flourish nor exist.
Read The Article
The most important plugin for your WordPress website
Google’s official WordPress plugin. Get insights about how people find and use your site, how to improve, and monetize your content, directly in your WordPress dashboard. If you have a WordPress website and would like to see how users find and use your website, Site Kit is right for you. To help you build, maintain, and grow your online presence, Site Kit gives you easy-to-understand metrics and actionable insights directly on your WordPress dashboard.
Read The Article
The tools, habits, and hardware needed to speed up your computer
Whether it happens gradually over time or all of a sudden, trying to work with a slow computer can be seriously frustrating. Even if you’re fairly diligent with the maintenance of your laptop or PC, it’s surprising how quickly things slow down. If you are asking yourself “Why is my laptop so slow” and running Windows 10, 8, or 7, this post is for you!
Read The Article